
In this blog post we will describe how to migrate a SQLServer Database between different SQL Instances using the Backup and Restore procedure.
The main advantage from migrating databases this way, is that it is less error prone than other procedures. I would recommend using this method on very static databases or databases where you can afford a longer downtime. A disadvantage would be that there needs to be a downtime when migrating this database, so if a requirement is that downtime must be zero, we would recommend using an other migrating procedure.
This example will be using 2 instances SQLServer 2017 so the compatibility level will remain the same (140) and we don’t need to take this in account. If you need to change compatibility level (in this case to 140. Look https://docs.microsoft.com/en-us/sql/t-sql/statements/alter-database-transact-sql-compatibility-level?view=sql-server-2017 for more info) you can use following command:
 Alter database [DATABASE]
SET COMPATIBILITY_LEVEL  =  140
We don’t really need any data so we will be using an empty database for this example.
To Create the database use following script :
CREATE DATABASE [ExampleDatabase]
GO

After a refresh of your object explorer the database will appear.
Now we can start with the Backup. You can either Backup the Database by using the GUI or you can use T-SQL. If you use the GUI you can always choose later to generate a script and still execute it as T-SQL.
To Backup the Database with the GUI you need to right click on the database and select Tasks then Backup. Now you should get following window. (see figure 1)
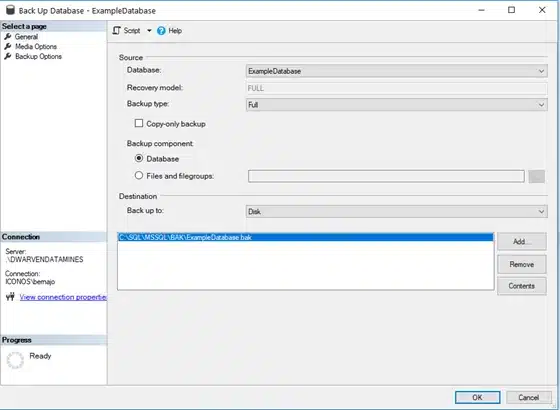
Figure 1 Backup General page
In this window we can specify which Database we want to Backup. Since we started on ExampleDatabase it already says ExampleDatabase. Here we also get information about which Recovery model is active (https://docs.microsoft.com/en-us/sql/relational-databases/backup-restore/recovery-models-sql-server?view=sql-server-2017 for more info), in this case FULL. This mean that we can choose between 3 Backup types ( more info https://www.mssqltips.com/sqlservertutorial/6/types-of-sql-server-backups/). We will choose Full in this example.
Destination means where you want to store your Backup. I will store my Backup as file here : C:\Backup\ExampleDatabase_FULL_02052018.bak . It is normally bad practice to store your Backups on the C:\ drive but since I only got 1 drive there aren’t any other options. When you press the add button you get the following (see figure 2)

Figure 2 setting up Backup Destination
If you need to change your Backup destination you can do this by filling in the name yourself (don’t forget that you are also naming your File) or pressing the right button with 3 dots and navigate in your folder structure.
Then press OK. You will now have 2 Destinations on you window, you can remove the one not wanted by selecting it and pressing remove button on the right.
Next we go to the Media Options page (see figure 3)
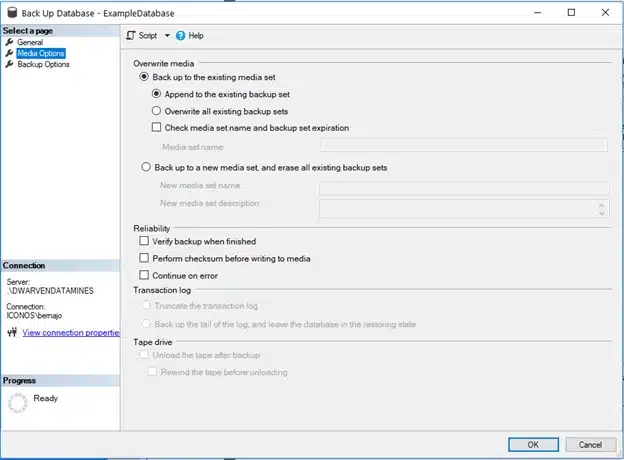
Figure 3 Media Option page
Overwrite media is not really relevant in this example. Since we use a unique name for the Backup Filename we don’t need to overwrite.
Reliability we will be using, It’s important to see that you don’t Backup a corrupt database, here we use WITH CHECKSUM option and the verify backup options for. These option checks that your backup can be successfully restored without errors. It verifies that each page of the database does not have a checksum or torn page error.
Continue on error stays disabled.
Next is the Backup Options page (see figure 4)
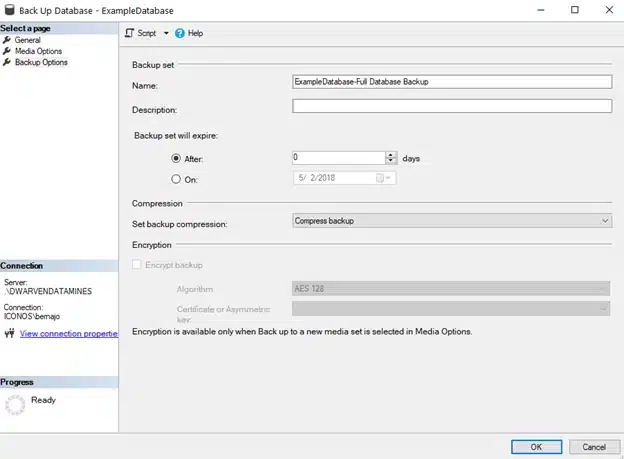
Figure 4 Backup Options page
On this page we can set a description if needed about the database. We can set expiration options, after x days is to define how many days you want to keep it or if you want a specific date you can use on: mm/dd/yyyy .
Compression won’t help much in my example, but with bigger databases it is recommended to enable compression.
I also won’t be using Encryption in this example, but I also recommend using it especially when transferring the database across the network.
Now the Backup is ready to complete, so you can press OK if you want to Backup it with the GUI or on the top press Script and a new query window will open with following script :
BACKUP DATABASE [ExampleDatabase] TO  DISK = N'C:\Backup\ExampleDatabase_FULL_02052018.bak' WITH NOFORMAT, NOINIT,
NAME = N'ExampleDatabase-Full Database Backup', SKIP, NOREWIND, NOUNLOAD, COMPRESSION,  STATS = 10, CHECKSUM
GO


-- next part does the verification of the backup
declare @backupSetId as int
select @backupSetId = position from msdb..backupset where database_name=N'ExampleDatabase' and backup_set_id=(select max(backup_set_id)
from msdb..backupset where database_name=N'ExampleDatabase' )
if @backupSetId is null begin raiserror(N'Verify failed. Backup information for database ''ExampleDatabase'' not found.', 16, 1) end
RESTORE VERIFYONLY FROM  DISK = N'C:\Backup\ExampleDatabase_FULL_02052018' WITH  FILE = @backupSetId,  NOUNLOAD,  NOREWIND
GO
Press f5 to execute.
Now that the Backup has been done we will start now with the Restore.
Again we will first be using the GUI and then getting the script.
To Restore you go the the TARGET instance (see figure 5)
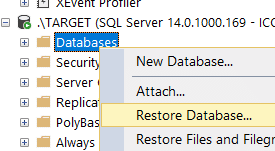
Figure 5
Now you get following window (see figure 6)

Figure 6
To select the database file first click on the button with 3 dots then add and then you select your Backup file as seen in figure 7. Then ok and ok.
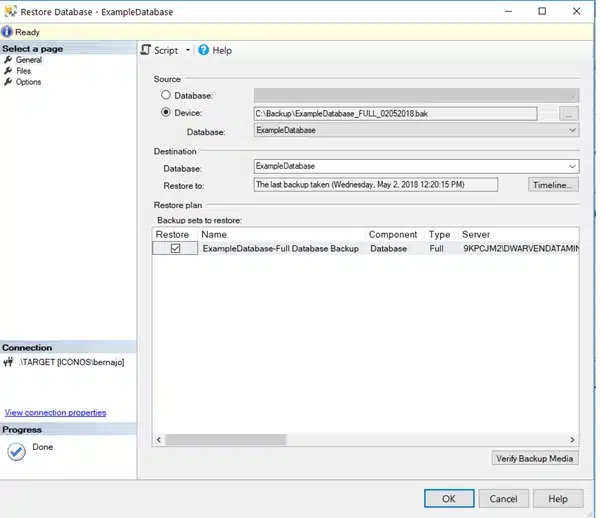
Figure 7
Next we go to the files page (see figure 8). Since we are migrating from a different server, the possibility that there will be a different disk setting is great. As previously mentioned, I only have 1 disk but I will still need to specify a different folder name. This will be almost always necessary because of the change in the disk or file structures.
This we can do by enabling Relocate all Files to folder. I will use C:\Target\Data for data file folder, this is where my main data file (.mdf) will be stored. For the log file folder I will be using C:\Target\Log this is where my transaction log (.ldf) will be stored.
For this example we don’t need to change anything in the options page.

Figure 8
Next we can press OK to start restoring or Script I you want to generate following script :
USE [master]
RESTORE DATABASE [ExampleDatabase] FROM  DISK = N'C:\Backup\ExampleDatabase_FULL_02052018.bak' WITH  FILE = 1,
MOVE N'ExampleDatabase' TO N'C:\Target\Data\ExampleDatabase.mdf',
MOVE N'ExampleDatabase_log' TO N'C:\Target\Log\ExampleDatabase_log.ldf',
NOUNLOAD,  STATS = 5

GO
Press f5 to execute.
Now you should have successfully migrated the ExampleDatabase from your source server to your target server.

The main advantage from migrating databases this way, is that it is less error prone than other procedures. I would recommend using this method on very static databases or databases where you can afford a longer downtime. A disadvantage would be that there needs to be a downtime when migrating this database, so if a requirement is that downtime must be zero we would recommend using another migrating procedure.

Crafted by ![]()
Crafted by ![]()


