


This article uses a simple example to demonstrate how to link an SCD Type 2 table in Power Query to a fact table. We show you how to easily recreate this!
We have two datasets: Sales and Person. Both are available as table objects in Excel.
A Sales table contains the sales data per person. A seller is identified using their PersonID. We also know when and for what amount a sale is made.
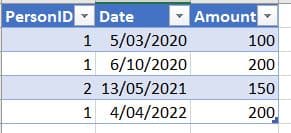
We also have some further details available per person in a Person table – in our example in the same Excel file, but the table can also come from a different source. The source makes no difference for Power Query.

As well as their Name, we also know which Department the person belongs to.
Note: we have two rows for PersonID = 1 (Jonas). This person evidently changed department on the date shown.
The table therefore has a second row with a slightly different ‘version’ of Jonas. This other version, in which Jonas belongs to a different department, applies for a different period. This is indicated in the DateFrom and DateThrough columns. A table such as this is therefore commonly known as an SCD Type 2 table (‘slowly changing dimension type 2’), or SCD2 for short.
In our example, each row in the Person table is also identified with an incremental number: PersonSK, the surrogate key.
Even though not required, you often see an IsCurrent column in an SCD2 table such as this as well. This indicates which rows represent the current versions. The IsCurrent column contains either a Yes or No value, but this can also be 1 or 0. In our example, the rows with PersonSK=2 and PersonSK=3 would be marked as current versions.
In a data warehouse scenario, the Sales table will be extended with the right surrogate key value from the Person table.
In our scenario, the source tables are available as Excel tables. We need to work out the link between the Sales and Person tables using the surrogate key in Person.
Our aim is to link the Sales rows with the correct Person rows, based on the PersonSK.
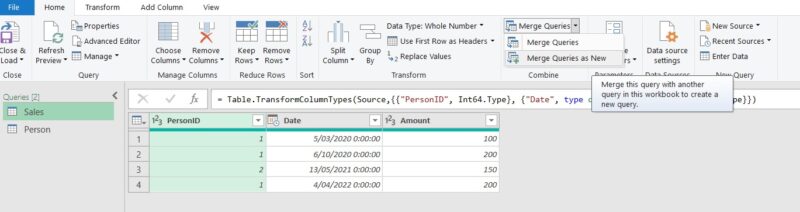
Step 1: Load both tables into Power Query. We assume an Excel environment here, but this is equally possible in a Power BI Desktop report.
Step 2: We create a new ‘SalesLinked’ dataset by merging the Sales dataset in Power Query – Merge Queries as New – with the Person dataset based on the PersonID column (Left Outer Join).
Note that for the merge operation, the PersonID column has the same data type in both datasets. In our case, this is the integer data type.
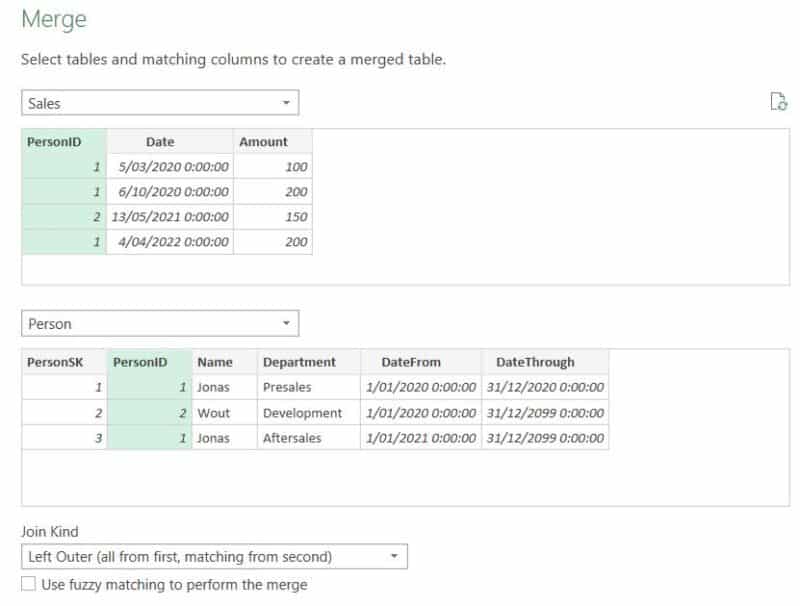
Because some Sales rows match with multiple Person rows (Person contains two versions for PersonID 1), we see a ‘Table’ value in the new Person column.

We click on the Expand button for the added Person column. This gives us a new row filled with the columns from the Person set for each possible combination from the Sales and Person datasets.
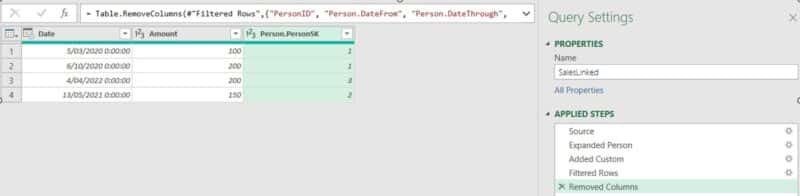
We do not copy all columns for this, but just those from PersonSK, DateFrom and DateThrough.

Our interim result appears as follows:

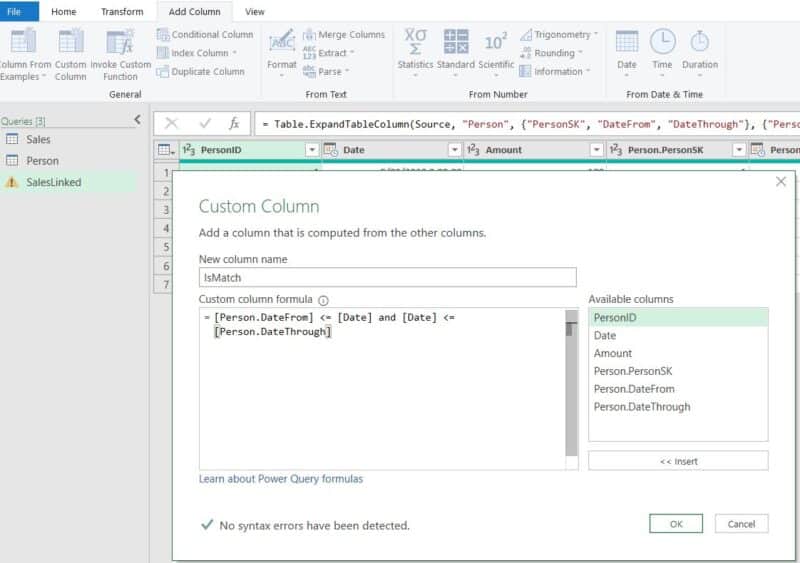
We ultimately have too many rows. We only want to keep the ones for which the Sales.Date falls within the Person.DateFrom and Person.DateThrough range of values.
We therefore add a Custom Column to our dataset with the name IsMatch. This column will indicate whether the row is valid or not.
We define the following formula: [Person.DateFrom] <= [Date] and [Date] <= [Person.DateThrough]
With the interim result:

We filter all the ‘False’ rows away using the Filter button on the IsMatch column header.
We also no longer need the Person.DateFrom, Person.DateThrough nor IsMatch columns, nor the original Sales.PersonID column: select them, right-click on the column headers, and choose Remove Columns.
This is our finale dataset:
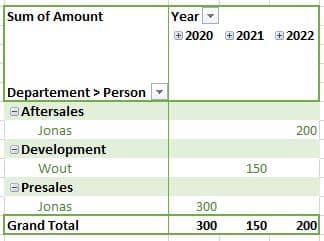
We can upload this in a Power BI model and directly link it to our Person table based on the PersonSK column.
An analysis of the data shows that the totals for Jonas and Wout are correct, and that the sales figures are also linked to the correct departments.
Note: Our Person source table had a surrogate key. If this is not the case, after uploading the table in Power Query, you can generate an Index Column that generates a surrogate key for you.


