


In the previous blog we have been creating the Linked Services between Azure Data Lake, Azure Data Factory (ADF) and our Azure Database.
We have seen the power of the Linked Service, the security model used, and how it glues everything together. In case you have not read my previous blog on Linked Service, I highly recommend doing so before reading this one. We will use the same Application and OAuth2 token created in my previous blog. You can reach the blog using this link.
That blog was just a showcase to show this technology using the power of ADF to copy the data into a database on a row by row basis sending its parameters to a stored procedure in your Azure SQL Database. This might not give you the performance you want when loading large volumes of data. We definitely need something more beefy to load larger csv files from Azure Data Lake into our Azure SQL Database or Azure DataWarehouse.
Enter Polybase External Tables. A technology introduced in SQL Server Parallel Datawarehouse (PDW) around 2013 and became more generally available since SQL 2016, allowing you to read flat files as easy as if they were database tables. When you combine this power with CTAS (Create Table As Select) or Merge statements, it can offer you all the juice and performance you will ever need for your large file landing operations.
Let’s get started.
To be able to use External tables you will first need to spin up an Azure Datawarehouse. I will not go into detail on how you do this, sure you’ll find it out pretty straightforward and it’s not difficult at all.
Create the Database Master Key to encrypt the credentials you provide in the next steps.
CREATE MASTER KEY;
Now you need to create the database scoped credential. The user the Azure DWH will use in order to connect to Azure Data Lake. In case you have not read my previous blog yet, please read and execute the section on the Azure Active Directory Applications (AAD).
CREATE DATABASE SCOPED CREDENTIAL ADL_User
WITH
    IDENTITY = '687a2a3f-1596-478d-8caa-5d4f6da29478@https://login.microsoftonline.com/9f0fd5a4-b5ae-44df-b77a-1d223bdcea41/oauth2/token',
    SECRET = '//kdb3O68Qi1SPzZb902BrnIuhL6SvuDbpjb0gbbyIk='
;
What does the code above mean?
CREATE DATABASE SCOPED CREDENTIAL ADLCredential
WITH
    IDENTITY = '@',
    SECRET = ''
;
<client_id>. This is the Application ID of your web application in the AAD.
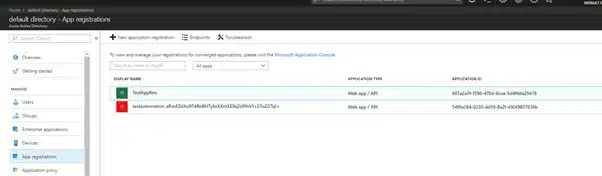
So under App Registrations you look for your Web App / API you created, and you copy the Application ID.
<OAuth_2.0_Token_EndPoint>. The OAuth2 Token EndPoint.
In the same screen as you found the Application ID, you go to Endpoints, and copy the OAUTH 2.0 TOKEN ENDPOINT
<key>. The secret of the Web App / API Application. You should have saved it somewhere when you created the App. But where huh? If you don’t find it, you can still generate a new Key under the Settings of your App. And under API Access you choose Keys.
In this step we define the location of the Datalake we want to read data from, and the format our files have. So even when you want 100+ files, all column separated with headers, in the same Data Lake Store, you need to define this only once.
CREATE EXTERNAL DATA SOURCE DatalakeKris
WITH
(
    TYPE = Hadoop,
    LOCATION = 'adl://datalakekris.azuredatalakestore.net/',
CREDENTIAL = ADL_User
);
How to find the Location in Azure?
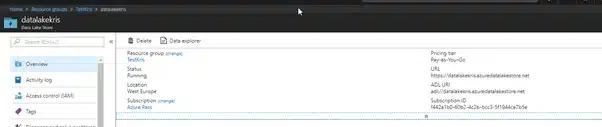
Go to your data lake, there you click on Essentials – Show Essentials. The ADL URI is the one you need for the location.
CREATE EXTERNAL FILE FORMAT TextFileFormatKris
WITH
(
    FORMAT_TYPE = DELIMITEDTEXT,
    FORMAT_OPTIONS
    (
        FIELD_TERMINATOR = ',',
FIRST_ROW  = 2,
        USE_TYPE_DEFAULT = FALSE
    )
);
We also need to define a generic file format our file(s) apply to. So here we create a delimited text one, with a comma separator and we choose to skip the first row as it contains the header.
Now you have everything set up, it is time to create the external table itself.
CREATE EXTERNAL TABLE [ext].[realestate](
street varchar(50),
city varchar(50),
zip varchar(10),
state char(2),
beds tinyint,
bads tinyint,
sq__ft smallint,
type varchar(50),
sale_date varchar(50),
price int,
latitude varchar(50),
longitude varchar(50)
)
WITH (LOCATION='/Input/RealEstate/',
    DATA_SOURCE = DatalakeKris,
    FILE_FORMAT = TextFileFormatKris,
    REJECT_TYPE = VALUE,
    REJECT_VALUE = 0
);
We define the format of the external table and specify each column in the source. Note that I just provided a folder location, this means that Polybase will read all files in the underlying folder and even scan the subfolders. Off course we used the data source and file format we just created.
It is important that the source data must identically match the table definition, if not the row will be rejected from the load.
The options REJECT_TYPE and REJECT_VALUE control the rejects. Here we define how many rows we allow to be wrong. We can also define a minimal threshold in % of the data to be correct. If the reject value is reached, the load of the external table will fail.
Now you can just query the External table like it was any other table.

Off course the story continues. We have created a very intelligent (meta)view now, but it’s still dependent on the underlying files in the Datalake making them slow(er) to query in real time as Polybase will always read all the files in the folder, even if you just asked for a top 10.
To increase query performance we need to materialize the data into a real table on our Azure Datawarehouse. To achieve this we will use the CTAS technique. We create a new table as a select from the External table.
CREATE TABLE [dbo].[RealEstate]
WITH (DISTRIBUTION = ROUND_ROBIN,
    CLUSTERED COLUMNSTORE INDEX  )
AS
SELECT * FROM [ext].[realestate]
Off course your story does not have to stop here. You can put the previous CTAS statement in a Stored Procedure, and use ADF as an orchestrator to handle your load and ADF is very proficient in triggering Stored Procedures on Azure DWH or Azure SQL Database enabling you to create a complete ELT flow.


