Controlling database deployment, managing (measured) deployment to production of database changes and keeping an overview of these changes can be challenging. As an answer to this problem, I’ve been searching for a well-working approach to implement Database Lifecycle Management (DLM), of which the target would be to use this approach on all projects. This blogpost will give you an overview of the why and how, and explains a little bit about the tools and setup we came up with. I discuss only one implementation of DLM, but depending on your specific needs it can be done in different ways.
Purpose
Why would you start to use DLM within a project? We can think of four reasons:
To track changes (when was the last change, who did it, …)
To learn from older versions/check-in comments, avoiding regression
To have developers, architects, DevOpps and DBA’s work together more closely
To review, monitor and measure on DB level, providing more control on the delivered changes
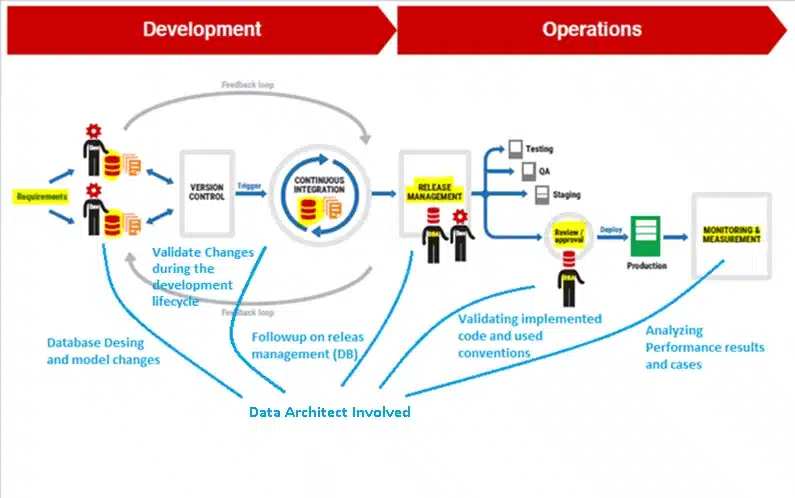
DLM should not be an extra overhead that bothers people. It should be a common way of controlling the process from development to a successful production product. By making teams work together more closely, everybody is in the loop about changes that are applied on ACC/ PRO. This enables developers, architects, DevOpps and DBA to reacts faster in specific cases or when problems occur.
Solution
When you want to go for a DLM solution, you need to choose a specific approach and appropriate tools. To make the best choice, you need to answer a couple of questions:
How many environments do we need?
Will we use a shared or local environment for development?
How much time/ many man-days will/can we spend for merging environments?
Which tools (versioning, …) are currently available?
After answering these questions, we went for an approach containing:
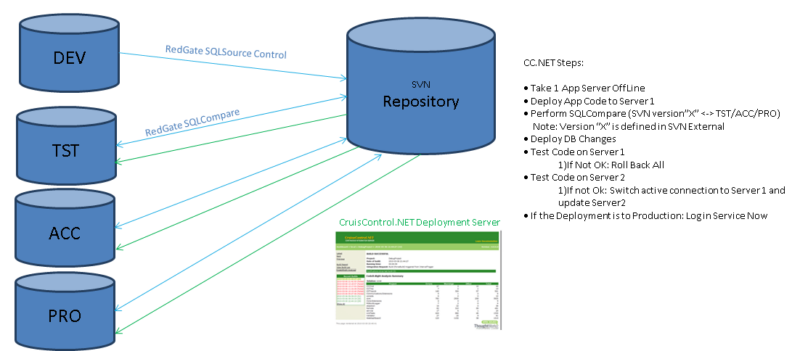
Four environments: DEV, TST, ACC, PRO
Subversion (SVN) repository with Redgate SQLSource Control to do the check-in. I did the same setup with TFS instead of Subversion and it worked the same.
Cruise Control / TeamCity to do the Deployment. We started with Cruise Control CC Net and migrated to TeamCity afterwards, because it had more logging details in case of errors.
Fail-safe deployment with scripts provided by the DevOps, also using RedGate Tools (SQL Compare)
In your SVN (or TFS) repository, you need to define a folder structure for all projects. We went for the following structure:
Trunc: one working version, no parallel development of different releases
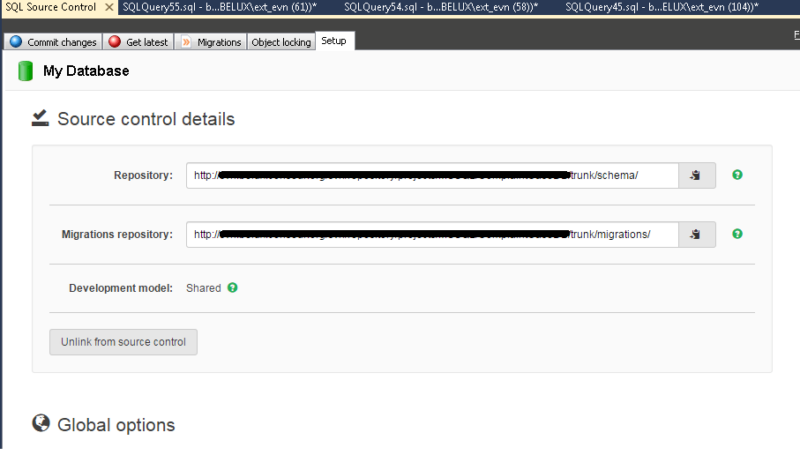
Schema: ddl of all objects, linked in SQL Source Control
Migrations: specific things that can’t be done in 1 ddl task, linked to te migrations folder in SQL Source Control. For example: add a non-nullable column, add nullable column, insert values, make column not-nullable
Tags: if you want to save an in between version to be able to go back
No Branches/Deploy folder depends on the DB strategy:
Shared DB: release, not used
Local Db: release, current App Dev Version
This is how the coupling with Red Gate SQL Source Control will look like in your management studio.
If you start using a DLM strategy, you also need to be make sure that everybody knows how to take the right actions when he/she makes changes or wants to deploy. Here is an example of our deployment chain:
Standard development Path: DEV > TST > ACC > PRO
Parallel Development tracks: require manual merge
Urgent Fix: in exceptional cases, a quick fix can be applied on PRO, but the change must be manually merged to:
– the last “environment” of every track
– The last development version + Checked in
DLM is not just “checking in Code”, it’s a way of working together
Practical implementation
Below we describe how we implemented the DLM in our environment. This is just one of the many possible approaches, so you can choose your own approach. We give this example on which you can base your own implementation with SVN or TFS.
We choose to keep all SQL scripts separated from the projects, but linked from the project (.NET, …) to the applicable SQL/SSRS/… folder.
Create a folder on a dedicated path for:
a. SQL (SQL Script)
b. SSIS (SSIS Package projects)
c. SSRS (SSRS reporting projects)
d. SSAS (SSAS analysis cube projects)
Prerequisite: Tortoise SVN must be installed on your local machine. You can install Tortoise SVN
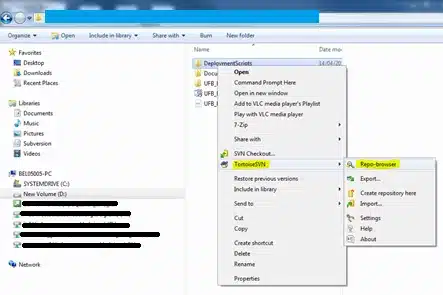
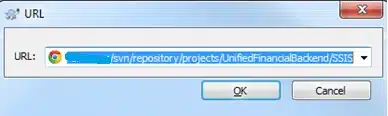
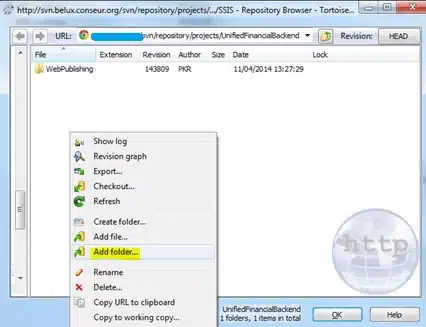
Link your project to SVN:
– Open “Repo-browser”:
– Go to the newly created SVN directory:
– Add folder:
Use TFS
1. Get the GetLatestAndApplyDBAddin from SourceControl.
2. Build and copy the output of the bin folder to your Visual Studio Addin folder.
3. Open the settings.xml file and set the localPath and scriptPath to your directory structure
4. Open the GetLatestAndApplyDB.AddIn file and change the path of the assembly element
5. Start Visual Studio
The first item under the Tools menu is now : GetLatestAndApplyDB (if not, go to \Tools\Addin manager in the menu and select the startup checkbox of GetLatestAndApplyDB), after that go to \Tools\Customize in the menu and select the Commands tab. Now make a command for the GetLatestAndApplyDB add-in.
6. Instead of doing a get latest version on the solution in the Solution Explorer, you click the GetLatestAndApplyDB menu item. A window will pop up with locations where you want to do a get latest version. After this, it automaticaly checks for databases changes. Do it before opening the solution otherwise it reloads all projects.
Exclude common project files from SVN for Projects (SSIS, SSRS, SSAS)
Also exclude the following objects as they generate too many conflicts:
– .SUO, .USR
– BIN Folder
– OBJ Folder
Install additional tools for SSIS / SSRS projects:
In order to simplify the check-in or development, the following tools are useful for SSIS, SSAS and SSRS development:
AnkhSvn
BIDSHelper
These tools will make it easier to perform a Lock, Check-in, … from within the project. When you lock a (part of a) project from within Visual Studio, it will be done under that security, if you want to perform a check-in from within the filesystem, it needs to be done under the same security!
SQL Server
Database specific security in SQL Server
There are many different ways to secure your database. In this blog post we will give most of them a...
We use cookies on our website to give you the most relevant experience by remembering your preferences and repeat visits. By clicking “Accept”, you consent to the use of ALL the cookies. However you may visit Cookie Settings to provide a controlled consent.
This website uses cookies to improve your experience while you navigate through the website. Out of these, the cookies that are categorized as necessary are stored on your browser as they are essential for the working of basic functionalities of the website. We also use third-party cookies that help us analyze and understand how you use this website. These cookies will be stored in your browser only with your consent. You also have the option to opt-out of these cookies. But opting out of some of these cookies may affect your browsing experience.