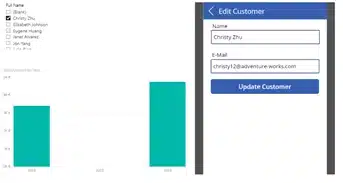


How can you integrate a Powerapps in Power BI to interact with your data, what are the possibilities? And Why would you want to integrate them in Power BI? Power BI is an amazing tool to visualize your data, but if you want to take actions depending on your data, PowerApps comes in handy. For example, you can email clients depending on your filter criteria in Power BI, or update the data of a given customer, all in your Power BI dashboard. Or if you want to work the other way around, you can select an item in your PowerApps gallery and Power BI will filter it’s data accordingly. In this blog we’ll guide you through the process of setting up your first PowerApps integration in Power BI.
First of all: We need to import the PowerApps custom visual in Power BI:
Open your Power BI report, in the ribbon click ‘Home’ > Custom visuals: ‘From Marketplace’
In the marketplace search for the PowerApps visual and click ‘Add’ to install it in your report.
After installing the PowerApps visual, we need to publish our report to Power BI, otherwise the PowerApps integration won’t work properly.
In the ribbon select ‘Home’ > Share: ‘Publish’, choose your workspace and click ‘Select’. After you have published the report, go to https://app.Power BI.com select your workspace and open your report. Then click ‘Edit report’.
Now, add the PowerApps visual to your report, by clicking on the PowerApps icon in your set of visualizations.
Before you create the PowerApps itself, you need to add the data fields you want to use in the PowerApps, in this case I would like the CustomerKey, Customer Name, Email and the Customer Image. It’s important to know that your PowerApps will only have access to the values you add to the PowerApps Data.
After you have selected the PowerApps Data fields, the PowerApps visual will ask you to choose an existing App or to create a new one. In this case we will create a new one.
A new PowerApps will open with a Power BIIntegration component, a Screen and a Gallery with some components. Note that the Gallery automatically imports the ‘Power BIIntegration Data’, or all the all the fields you have selected in Power BI.
In the Properties of the Gallery you can change the layout of the gallery and select the fields that will represent the data. After you have selected the layout that fits best for your application, click on ‘Edit’ next to ‘Fields’.
In the Edit Fields window you can select which component should display which data field that you passed through in Power BI.
When you are finished creating the PowerApps you can save and publish your app. Refresh your Report in Power BI and the PowerApps should be integrated! The items in PowerApps will change accordingly to the filters that you apply in Power BI.
Now the possibilities are (almost) endless:
Examples:
A list off all the customers:
Or filter Customers:
Send an Email to a specific customer:
Update a customers’ information:
Note: If you want to refresh your visuals in Power BI after you have updated the data in PowerApps, use the statement: Power BIIntegration.Refresh() after your Patch() statement in PowerApps.