


1. Requirements
2. Register a repository on Docker Hub
3. Create the first Azure resources
4. Building and testing the container locally
5. Creating the Azure resources for the Container Instance
6. Optional: Disable access via environment variables to key vault
7. Closing words & further reading
Here are some of the requirements for my project:
After looking around in the Azure Portal, I ended up with Azure Container Instances. The way Microsoft describes it in the product overview:
“Develop apps fast without managing virtual machines or having to learn new tools – it’s just your application, in a container, running in the cloud.”
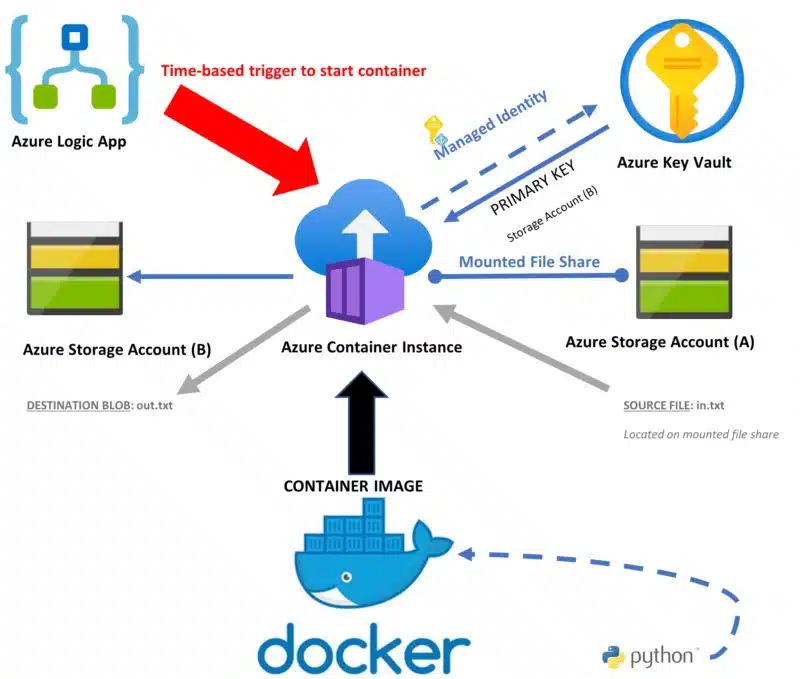
Bam, exactly what I was looking for! In this blog post, I will show how you can create a container which reads a text file from an Azure file share on storage account A, and writes the content to an Azure blob on storage account B. Nothing special, but interesting enough to explore some of the basic features of Azure Container Instances (ACI).
We’ll use an Azure key vault to store the primary key of storage account B and a managed identity to authenticate the Azure Container Instance with the key vault. During local development, we’ll use environment variables for authentication. The Azure file share will be mounted in the container. The files within this file share will appear as if they were local. It is important to know that files within an ACI are not persistent, but can be made persistent by mounting an Azure file share and storing the files in the mounted directory.
An overview of all the resources in my project is shown below:
Okay, time for some action! We’ll start by configuring Docker.
At the time of writing, you can create one private repository for free on Docker Hub. A free account has data transfer restrictions. More info about the pricing and subscriptions can be found here: https://www.docker.com/pricing.
For this blog post, I’ll proceed with a Private repository. You can also create an Azure Container Registry to store your Docker Images instead of using Docker Hub.

Okay, Docker is configured. Let’s head over to Azure. Here, we’ll start by creating two storage accounts. One for the file share and one for the destination blob.
Add the file in.txt to the file share (the file I used contains the following text: Hello World!)
The storage accounts are configured. Next, we’re going to make a key vault. This will be the place where we store all secrets and cryptographic keys for our cloud application. The primary key of storage account B will be stored here. This key is used by the Python script to create a connection string.
Go to storage account ⟶ settings ⟶ access keys and copy the value of key1.
Next go to the key vault ⟶ settings ⟶ secrets ⟶ generate/import. Here, you can add the access key to the vault.
I’ll use testsecret as secret name. That’s it for now.
This step is needed to make sure we can authenticate to the key vault via environment variables during local development.
Go to Azure Active Directory ⟶ Manage ⟶ App Registrations.
Next, click on new registration and type a name for the app registration. I always use the URL of the key vault, in other words, I enter: <NAME OF VAULT>.vault.azure.net. When the app is registered, you will see the client and tenant ID. These are 2/3 values that we need for authentication via environment variables.
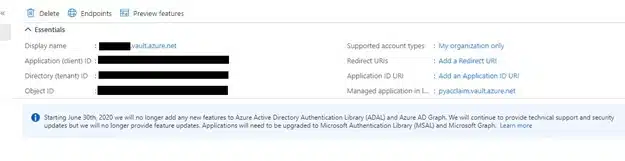
The third value we need for authentication is the client secret. To create this value, go to Manage ⟶ Certificates & secrets in the app registrations menu and click on new client secret. Choose a description and copy the client secret to Notepad. You won’t be able to retrieve it after leaving the blade.
That’s it! We have all the values we need for authentication via environment variables.
Next, go to the key vault ⟶ access policies ⟶ Add access policy. Allow GET-requests for secrets and select the principal. Here you have to search for the name of your app registration (in my case: <NAME OF VAULT>.vault.azure.net). Don’t forget to save your changes.

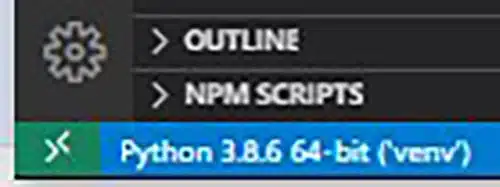
Before we start developing, let’s first make a folder for this project. I’ll proceed with a folder named ProjectFolder. I always use virtual environments for my Python projects to avoid conflicting requirements between multiple applications. This also makes it a lot easier to organize the packages per project. To create the virtual environment, open the project folder with Visual Studio Code. I configured PowerShell as the default shell. You can choose the default shell in the selection menu of the terminal window.

Next, enter the following instructions in the terminal:
python -m venv venv
A folder named venv will appear in ProjectFolder. To activate the virtual environment in the terminal, enter following instructions:
venv\Scripts\activate
For the next steps, make sure that you change the Python interpreter in Visual Studio Code by clicking on the Python text in the status bar and selecting the interpreter from within venv. This option appears after you have created the first Python file.
For this example we’ll need azure-identity, azure-storage-blob and azure-key vault-secrets. Run the following instructions in your virtual environment to install these packages.
pip install azure-identity

pip install azure-storage-blob

pip install azure-keyvault-secrets
More information about working with virtual environments in Python can be found at the following location: https://docs.python.org/3/tutorial/venv.html
We have a virtual environment in our project folder. The next step is adding a folder for our script. So, let’s add a new folder named src in ProjectFolder.
import os

import io

from datetime import datetime

from azure.identity import DefaultAzureCredential

from azure.storage.blob import BlobClient

from azure.keyvault.secrets import SecretClient
# Configuration
BLOB_account =
BLOB_container =
BLOB_name = 'out.txt'
FS_fname = 'in.txt'
KV_account =
KV_secret_name = 'testsecret'
# Print datetime and environment variables
print(f'{datetime.now()}')
print(f'This is an environment variable: {os.environ.get("public1")}')
print(f'This is a secret environment variable: {os.environ.get("private1")}')
# Authenticate with Azure
# (1) environment variables, (2) Managed Identity, (3) User logged in in Microsoft application, ...
AZ_credential = DefaultAzureCredential()
# Retrieve primary key for blob from the Azure Keyvault
KV_url = f'https://{KV_account}.vault.azure.net'
KV_secretClient = SecretClient(vault_url=KV_url, credential=AZ_credential)
BLOB_PrimaryKey = KV_secretClient.get_secret(KV_secret_name).value
# Set the BLOB client
BLOB_CONN_STR = f'DefaultEndpointsProtocol=https;AccountName={BLOB_account};AccountKey={BLOB_PrimaryKey};EndpointSuffix=core.windows.net'
BLOB_client = BlobClient.from_connection_string(conn_str=BLOB_CONN_STR, container_name=BLOB_container, blob_name=BLOB_name)
# Read text-file from mounted fileshare and write to BLOB
with open(f'mnt/{FS_fname}', 'rb') as f:
dataBytesBuffer = io.BytesIO(f.read())
dataBytesBuffer.seek(0)
BLOB_client.upload_blob(dataBytesBuffer, overwrite=True)
print(f'File successfully uploaded to blob')
In the next step, we will configure the authentication with the key vault. Once this is done, the script will print
It will also upload the file in from the file share to the BLOB. The public/private environment variables will be configured during the creation of the Azure Container Instance.
First, we have to set our environment variables so we can access the Azure key vault locally. To do this, add the following lines after the imports in the Python script:
# ONLY FOR LOCAL TESTING #######################################os.environ['AZURE_TENANT_ID'] = os.environ['AZURE_CLIENT_ID'] = os.environ['AZURE_CLIENT_SECRET'] =#############################################################These values were created in 3.3 (Azure Active Directory – App Registrations).
Next, make a new folder named mnt in ProjectFolder. Add in.txt to this folder. (This is the same text file that we added to the file share.) We will mount this folder locally instead of mounting the Azure file share during development.
When the environment variables are set correctly, run the script in the virtual environment. Make sure that you select the correct Python interpreter. If all went well, you should see the out.txt file in your BLOB container on Azure.
IMPORTANT:
Remove these lines from the script before building the docker image. Just like with Git repositories, it’s never a good idea to store credentials in source code.
Okay, now that we have a working script, it’s time to freeze our Python requirements in a text file. Make sure you are in your virtual environment. [Reminder: the line in the terminal should start with (venv).] Then, type the following command in your Visual Studio Code terminal:
pip freeze > requirements.txtYou should see requirements.txt file in the file explorer. Move this file to the src-folder.
IMPORTANT:
Open this file and remove pywin32. This module is for Windows only and will not work in our Linux container.
Time to write our Dockerfile. But first, what is a Dockerfile? A Dockerfile is a text document that contains all the commands to assemble the image. Our file will instruct Docker to start from the Python base image, adjust some settings and install Python packages from the requirements list. Next, it will move our script files to the image and specify the working directory. We’ll create a folder named app as the working directory. The src folder and mnt folder will be added to this folder.
The CMD instruction at the end of our Dockerfile specifies the default command that runs when a container is started. So, here we tell Docker to launch our application.
For selecting the Python base image, we are heading over to https://hub.docker.com/_/python where we can find an overview of publicly available Python images.
I will continue with the 3.8.6 slim-buster image as I’m currently working with this version of Python. So, copy the following code to a file named Dockerfile in ProjectFolder.
# Start from python slim-buster docker imageFROM python:3.8.6-slim-busterRUN apt-get updateRUN apt-get upgrade -y# Change TimeZoneENV TZ=Europe/BrusselsRUN ln -snf /usr/share/zoneinfo/$TZ /etc/localtime && echo $TZ > /etc/timezoneRUN echo $(date)# Copy files to working directoryCOPY ./src/ /app/src/WORKDIR /app# Install python packages using requirements.txtRUN pip install -r src/requirements.txt
# Run the scriptCMD python src/script.pyBefore we start building the Docker image from our Dockerfile, make sure you have the following file and folder structure.
Open a PowerShell terminal in the ProjectFolder and enter the following instructions to create the local docker image. Make sure that Docker Desktop is running and that you have removed the Tenant ID, Client ID and Client Secret from script.py.
docker build . -t
So, for example: docker build . -t johanhostens/kohera:test
You can list all your local images with the command:
docker images
To test the local Docker image, we’ll be using the environment variables again. First, we’ll start a local container interactively. The PowerShell command is shown below. This will open an interactive shell; you can explore the contents with shell instructions. To close the session, type exit. You can also start the Python script from here as a final check.
docker run `

-e AZURE_TENANT_ID=`
-e AZURE_CLIENT_ID= `
-e AZURE_CLIENT_SECRET= `
-e public1="Public environment variable" `
-e private1="Private environment variable" `
-v $PWD\mnt:/app/mnt `
-it `
`

sh
To run the container locally, copy the previous PowerShell command and remove -it and sh. This gives the following command:
docker run `

-e AZURE_TENANT_ID=`
-e AZURE_CLIENT_ID= `
-e AZURE_CLIENT_SECRET= `
-e public1="Public environment value" `
-e private1="Private environment value" `
-v $PWD\mnt:/app/mnt `
If everything went well, you should have a functional container image that returns the following text after execution:
Once the virtual environment is active, you can use pip install to install additional packages. The activation step can be easily verified. You are using the virtual environment named venv when the terminal line starts with (venv)
![]()
For this example we’ll need azure-identity, azure-storage-blob and azure-key vault-secrets. Run the following instructions in your virtual environment to install these packages.
pip install azure-identity

pip install azure-storage-blob

pip install azure-keyvault-secrets
More information about working with virtual environments in Python can be found at the following location: https://docs.python.org/3/tutorial/venv.html
We have a virtual environment in our project folder. The next step is adding a folder for our script. So, let’s add a new folder named src in ProjectFolder.
import os

import io

from datetime import datetime

from azure.identity import DefaultAzureCredential

from azure.storage.blob import BlobClient

from azure.keyvault.secrets import SecretClient
# Configuration
BLOB_account =
BLOB_container =
BLOB_name = 'out.txt'
FS_fname = 'in.txt'
KV_account =
KV_secret_name = 'testsecret'
# Print datetime and environment variables
print(f'{datetime.now()}')
print(f'This is an environment variable: {os.environ.get("public1")}')
print(f'This is a secret environment variable: {os.environ.get("private1")}')
# Authenticate with Azure
# (1) environment variables, (2) Managed Identity, (3) User logged in in Microsoft application, ...
AZ_credential = DefaultAzureCredential()
# Retrieve primary key for blob from the Azure Keyvault
KV_url = f'https://{KV_account}.vault.azure.net'
KV_secretClient = SecretClient(vault_url=KV_url, credential=AZ_credential)
BLOB_PrimaryKey = KV_secretClient.get_secret(KV_secret_name).value
# Set the BLOB client
BLOB_CONN_STR = f'DefaultEndpointsProtocol=https;AccountName={BLOB_account};AccountKey={BLOB_PrimaryKey};EndpointSuffix=core.windows.net'
BLOB_client = BlobClient.from_connection_string(conn_str=BLOB_CONN_STR, container_name=BLOB_container, blob_name=BLOB_name)
# Read text-file from mounted fileshare and write to BLOB
with open(f'mnt/{FS_fname}', 'rb') as f:
dataBytesBuffer = io.BytesIO(f.read())
dataBytesBuffer.seek(0)
BLOB_client.upload_blob(dataBytesBuffer, overwrite=True)
print(f'File successfully uploaded to blob')
In the next step, we will configure the authentication with the key vault. Once this is done, the script will print
It will also upload the file in from the file share to the BLOB. The public/private environment variables will be configured during the creation of the Azure Container Instance.
First, we have to set our environment variables so we can access the Azure key vault locally. To do this, add the following lines after the imports in the Python script:
# ONLY FOR LOCAL TESTING #######################################os.environ['AZURE_TENANT_ID'] = os.environ['AZURE_CLIENT_ID'] = os.environ['AZURE_CLIENT_SECRET'] =#############################################################These values were created in 3.3 (Azure Active Directory – App Registrations).
Next, make a new folder named mnt in ProjectFolder. Add in.txt to this folder. (This is the same text file that we added to the file share.) We will mount this folder locally instead of mounting the Azure file share during development.
When the environment variables are set correctly, run the script in the virtual environment. Make sure that you select the correct Python interpreter. If all went well, you should see the out.txt file in your BLOB container on Azure.
IMPORTANT:
Remove these lines from the script before building the docker image. Just like with Git repositories, it’s never a good idea to store credentials in source code.
Okay, now that we have a working script, it’s time to freeze our Python requirements in a text file. Make sure you are in your virtual environment. [Reminder: the line in the terminal should start with (venv).] Then, type the following command in your Visual Studio Code terminal:
pip freeze > requirements.txtYou should see requirements.txt file in the file explorer. Move this file to the src-folder.
IMPORTANT:
Open this file and remove pywin32. This module is for Windows only and will not work in our Linux container.
Time to write our Dockerfile. But first, what is a Dockerfile? A Dockerfile is a text document that contains all the commands to assemble the image. Our file will instruct Docker to start from the Python base image, adjust some settings and install Python packages from the requirements list. Next, it will move our script files to the image and specify the working directory. We’ll create a folder named app as the working directory. The src folder and mnt folder will be added to this folder.
The CMD instruction at the end of our Dockerfile specifies the default command that runs when a container is started. So, here we tell Docker to launch our application.
For selecting the Python base image, we are heading over to https://hub.docker.com/_/python where we can find an overview of publicly available Python images.
I will continue with the 3.8.6 slim-buster image as I’m currently working with this version of Python. So, copy the following code to a file named Dockerfile in ProjectFolder.
# Start from python slim-buster docker imageFROM python:3.8.6-slim-busterRUN apt-get updateRUN apt-get upgrade -y# Change TimeZoneENV TZ=Europe/BrusselsRUN ln -snf /usr/share/zoneinfo/$TZ /etc/localtime && echo $TZ > /etc/timezoneRUN echo $(date)# Copy files to working directoryCOPY ./src/ /app/src/WORKDIR /app# Install python packages using requirements.txtRUN pip install -r src/requirements.txt
# Run the scriptCMD python src/script.pyBefore we start building the Docker image from our Dockerfile, make sure you have the following file and folder structure.
Open a PowerShell terminal in the ProjectFolder and enter the following instructions to create the local docker image. Make sure that Docker Desktop is running and that you have removed the Tenant ID, Client ID and Client Secret from script.py.
docker build . -t
So, for example: docker build . -t johanhostens/kohera:test
You can list all your local images with the command:
docker images
To test the local Docker image, we’ll be using the environment variables again. First, we’ll start a local container interactively. The PowerShell command is shown below. This will open an interactive shell; you can explore the contents with shell instructions. To close the session, type exit. You can also start the Python script from here as a final check.
docker run `

-e AZURE_TENANT_ID=`
-e AZURE_CLIENT_ID= `
-e AZURE_CLIENT_SECRET= `
-e public1="Public environment variable" `
-e private1="Private environment variable" `
-v $PWD\mnt:/app/mnt `
-it `
`

sh
To run the container locally, copy the previous PowerShell command and remove -it and sh. This gives the following command:
docker run `

-e AZURE_TENANT_ID=`
-e AZURE_CLIENT_ID= `
-e AZURE_CLIENT_SECRET= `
-e public1="Public environment value" `
-e private1="Private environment value" `
-v $PWD\mnt:/app/mnt `
If everything went well, you should have a functional container image that returns the following text after execution:
![]()
Remark: If you are using Command Prompt (CMD) instead of PowerShell:
The container works fine, so it’s time to push our hard work to the cloud. This can be done with the following PowerShell command:
docker push <DOCKERID>/<REPOSITORY>:<TAGNAME>
So, for example: docker push johanhostens/kohera:test
One of the requirements is a simple integration with Azure services. The container must communicate with storage account B, so authentication will be required. Authentication between the ACI and storage account B can be implemented by using a managed identity and a key vault. The primary key to access storage account B will be stored as a secret in the key vault. The ACI will be able to read secrets from the key vault by its managed identity. No keys or credentials have to be entered in the source code or via environment variables.
You can choose between system-assigned or user-assigned managed identities.
We will create a system-assigned managed identity during the ACI creation in the next step. Authentication between storage account A and the ACI takes place by entering the primary key in the create statement of the ACI.
You can create the ACI in Azure Portal, but more configuration options are available with Azure CLI. That’s why I’ll use the CLI-approach in this blog post. An overview of the CLI create command and all its available options can be found here: https://docs.microsoft.com/en-us/cli/azure/container?view=azure-cli-latest#az_container_create
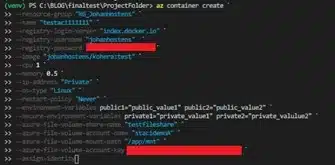
To continue, open a PowerShell terminal and log in to Azure via az login. Next, run the following container create command to build the ACI.
az login
Enter your Azure credentials
az container create `“<RESOURCE GROUP>”
--resource-group `“testaci111111”
--name `“<DOCKER USERNAME>”
--registry-login-server "index.docker.io" `
--registry-username `“<DOCKER PASSWORD>”
--registry-password `<DOCKERID>
--image "/<REPOSITORY>:<TAGNAME>" `testfileshare
--cpu 1 `
--memory 0.5 `
--ip-address "Private" `
--os-type "Linux" `
--restart-policy "Never" `
--environment-variables public1="public_value1" public2="public_value2" `
--secure-environment-variables private1="private_value1" private2="private_valulue2" `
--azure-file-volume-share-name "" `“<STORAGE ACCOUNT A NAME”
--azure-file-volume-account-name `“<STORAGE ACCOUNT A PRIMARY KEY>”
--azure-file-volume-mount-path "/app/mnt" `
--azure-file-volume-account-key `
--assign-identity
Remarks:
You should have something that looks like this. Please be patient; it takes a while to get the container operational in Azure.
When this script finishes, the ACI appears in the Azure portal. But maybe the first run failed? This shouldn’t be a surprise. We didn’t pass the environment variables to connect with the key vault and our managed identity has no access to the key vault yet. We’ll fix this issue in the next steps.
To add the managed identity to the key vault, do the following:
Go to key vault ⟶ settings ⟶ access policies ⟶ add access policy.
Select Get for secret permissions and select for the name of the ACI in the select principal section. Add the principal and again don’t forget to save your changes. Now the application inside the container can read secrets from the key vault.
These are the same steps as described in 3.4.
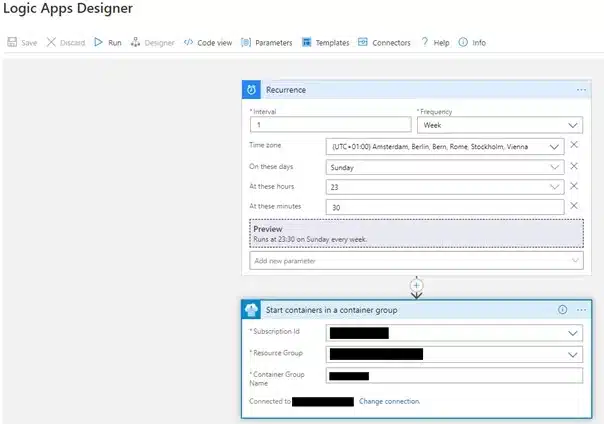
Last but not least, we need a simple way to trigger the container to run on a timely basis. Azure Logic apps to the rescue! Create a logic app and add two steps.
Step 1: Recurrence ⟶ configure when the script should be run
Step 2: Start containers in a container group ⟶ fill in subscription id, resource group, container group name
Save and you’re done. Always great when things are this simple!
More information about the pricing of logic apps can be found here: https://azure.microsoft.com/en-us/pricing/details/logic-apps/
Now run the ACI or start the logic app to see everything in action. When you open the Container instance in Azure and navigate to Settings ⟶ Containers, you will see 4 tabs: Events, Properties, Logs and Connect.
In the event log you can see the two steps that were taken to run your container image.
Each time the container is started, the image is pulled from the repository again.
In properties you can see an overview of:
(*) Here, you can also spot the difference between secure environment variables and standard environment variables. Only the values of standard environment variables are shown in the portal. It’s also worth noting that at the time of writing, environment variables can’t be changed for ACIs. If you want to change them, you’ll have to create a new ACI.
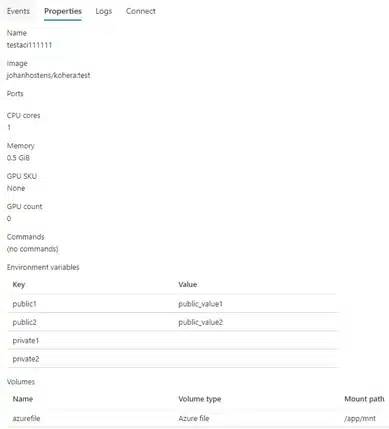
In logs you can see the prints from our Python script (from the last run).
Now that the ACI is fully functional, you can delete the client secret that you’ve specified in 3.3. The ACI doesn’t need this as it uses its managed identity. I’ve only used the environment variables to access the key vault during local development. When after a while you need local access to the key vault again, you can create a new client secret.
So, that was my brief introduction to Azure Container Instances. There is so much more within the possibilities of ACIs. You can explore other programming languages, connect other services, connect multiple containers, implement a container orchestrator like Azure Kubernetes Service (AKS) and more. Some interesting references for further reading are listed below.
Have fun with the further exploration!
Documentation:
Pricing :

Crafted by ![]()
Crafted by ![]()


