

The DatabaseMail feature in SQL Server and Managed Instance is widely used by many professionals. But what if you want similar functionality in Azure SQL Database? There are options, but it requires a bit of tinkering. Tinkering that we gladly explain in this blog.
So, you want to create something in Azure SQL Database that replicates the DatabaseMail feature. You could build an alternative solution by using a mailtable, a mailservice and logic apps. However, the much-missed SQL Agent is missing in Azure SQL Database. You could substitute that with Elastic Database Jobs. So, what if you want to combine the features of Elastic Database Jobs with the DatabaseMail alternative and let your jobs trigger emails?
One approach would be to create a mailtable in every database, let the job insert data into it and use a logic app to query each database individually. However, suppose you have hundreds of databases. That would be a hell of a job and for each newly created database, you would need to modify your logic app. Luckily, we can use the output clause of Elastic Database Jobs to insert emails in a central mailtable in the JobDatabase. Meaning you would only need to create a single logic app that will fetch messages from a central mailtable. Let’s get this sorted!
The first thing to do before we can get started is create an Elastic Job agent and a SQL Database to hold the systemobjects or JobDatabase in my case. This setup is out of scope for this blog, but you can find lots of good articles online. One thing I’d like to recommend is to use target groups referring to Azure SQL Servers or Elastic Pools instead of individual databases. Whenever new databases are added to the server or pool, they will be included as target automatically.
The official documentation can be found here: https://docs.microsoft.com/en-us/azure/azure-sql/database/elastic-jobs-overview .
After the JobDatabase and necessary elastic jobs have been set up, we need to create a table in our JobDatabase to store emails. Records in this table will be retrieved by a logic app and their fields will be used to construct an email. To find newly inserted records, the primary key of this table is used. Therefore, you shouldn’t reseed its identity value by, for example, truncating the table.
Here you can find the Data Definition Language (DDL) I used for the table. Most columns are self-explanatory except for Internal_execution_id. This column is used to store the execution id of our job.
CREATE TABLE [dbo].[DatabaseMail](

       [MailID] [int] IDENTITY(1,1) NOT NULL,

       [MailText] [nvarchar](max) NULL,

       [MailSubject] [nvarchar](250) NULL,

       [MailTo] [nvarchar](250) NULL,

       [MailFrom] [nvarchar](250) NULL,

       [InsertDate] [datetime] NULL,

       [internal_execution_id] [uniqueidentifier] NULL,

PRIMARY KEY CLUSTERED

(

       [MailID] ASC

)WITH (STATISTICS_NORECOMPUTE = OFF, IGNORE_DUP_KEY = OFF) ON [PRIMARY]

) ON [PRIMARY] TEXTIMAGE_ON [PRIMARY];

GO


ALTER TABLE [dbo].[DatabaseMail]
ADD  CONSTRAINT [DF_DatabaseMail_MailFrom]
DEFAULT (N'noreply@kohera.be') FOR [MailFrom];

GO


ALTER TABLE [dbo].[DatabaseMail]
ADD  DEFAULT (getdate()) FOR [InsertDate];

GO
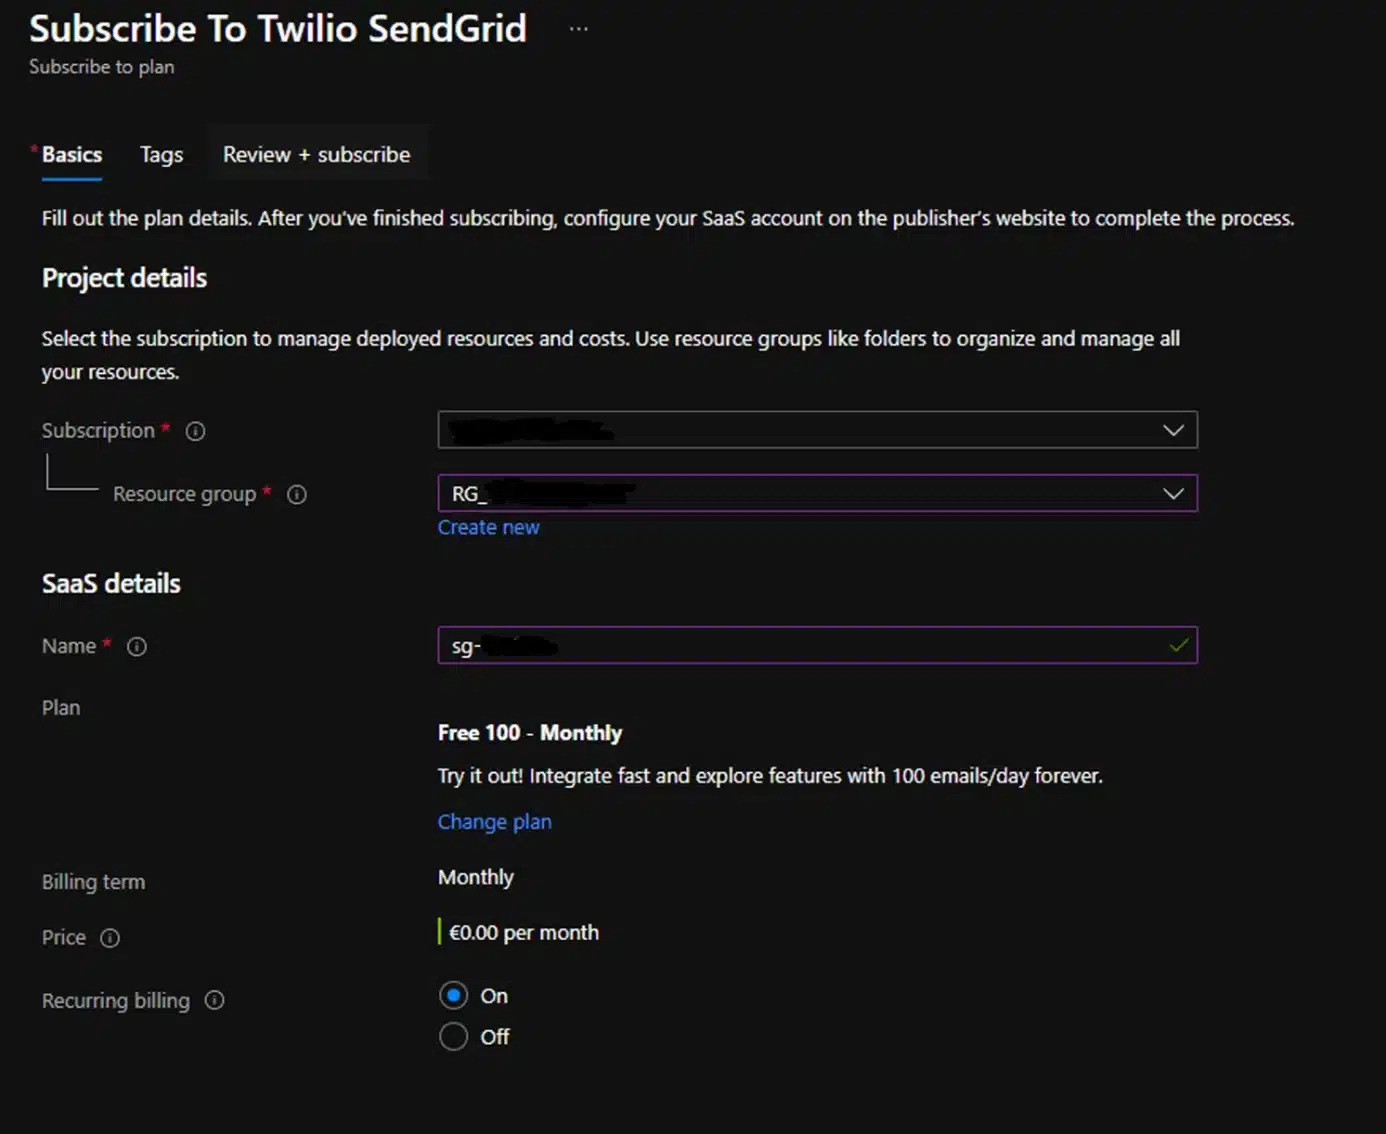
To send out the emails we need a mailing service. In my case, I chose SendGrid because it has a free tier that gives you 100 free mails per day. But you can choose almost any mail service for this use case, so just go for your preferred solution.

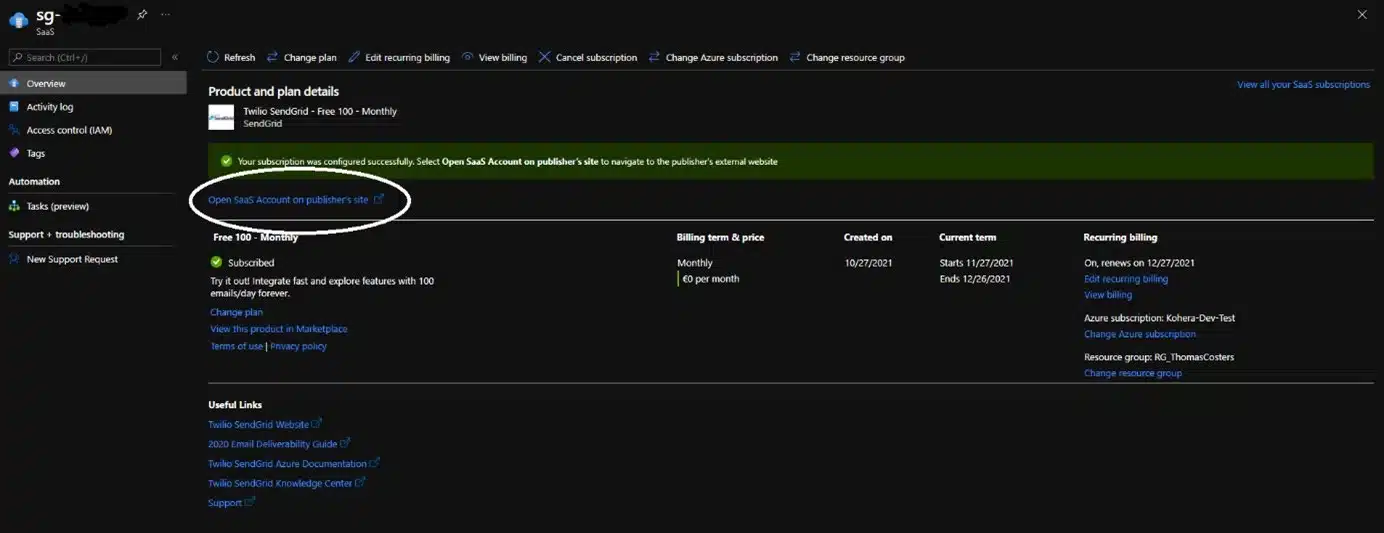
The next thing we need is an API key that will be used by our logic app to connect to the mail service. In the case of SendGrid, you need to go the newly created resource and click on “Open SAAS Account on Publishers site.”

This will bring you to a dashboard where you get an overview of, for example, the number of emails that have been sent. For now, we only need to create an API key. This can be done by going to Settings > API keys > Create API Key.
In the pop-up, you can enter a name for your key and specify the permissions associated with it. Mail Send permissions should suffice.

Make sure that you copy the API key, it won’t be displayed again afterwards!

Next, you need to verify your sender identity to protect your reputation. In my case – this was only for testing purposes – I chose to use the single sender method. The downside of this method is that mails can only be sent from a single (verified) email address.
For more information: https://docs.sendgrid.com/for-developers/sending-email/sender-identity
If you’ll never interact with the email, it’s recommended to set up domain authentication. This allows you to use any address within your domain, such as noreply@domain.com.
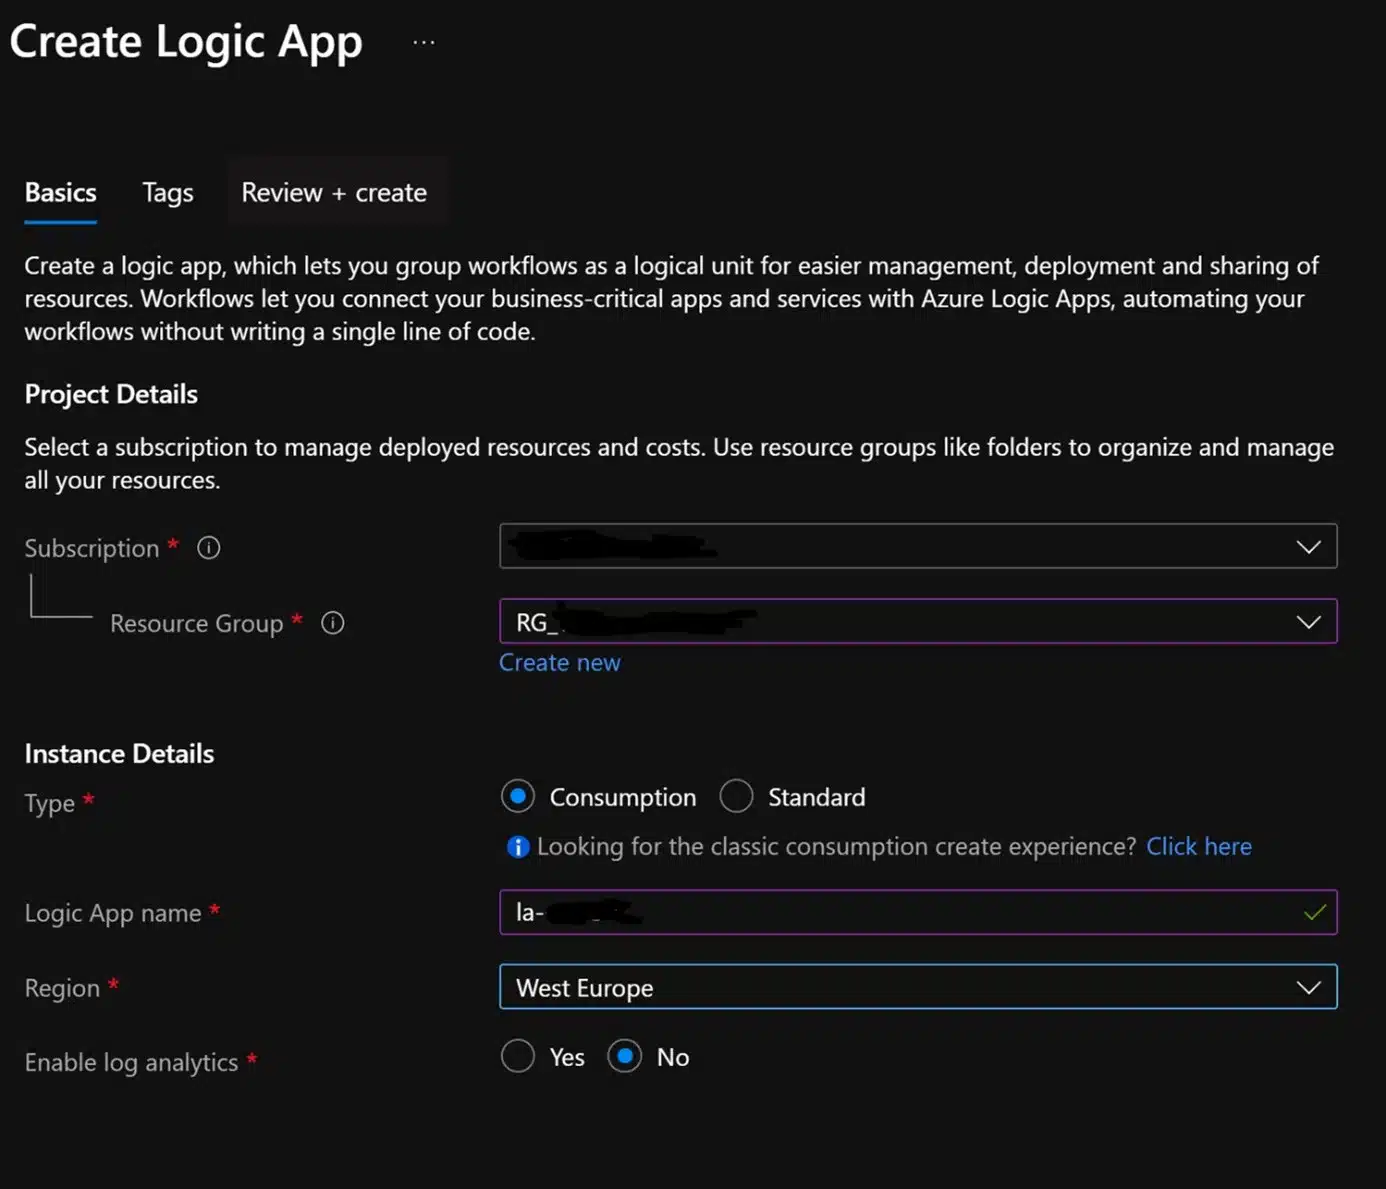
To fetch the emails from our [dbo].[DatabaseMail] table and send them to SendGrid, we need to set up a logic app. I chose for the consumption-based pricing tier. As the logic app only runs every X minutes and uses few actions and connectors, this is the cheaper option.

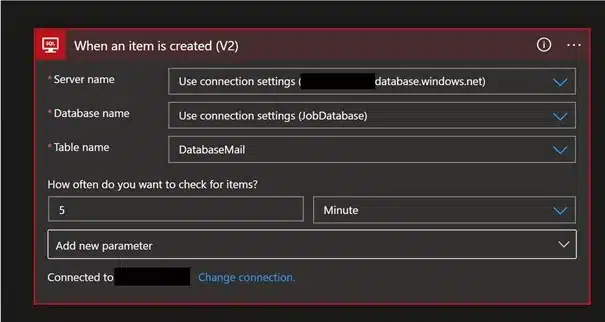
Afterwards, go to your newly created app and open the designer. Here we will define the order of actions. The first step will check for newly created items in our [dbo].[DatabaseMail] table. This is done, as said before, based on the Primary Key. Therefore, never interfere with the autonumbering as messages might not be picked up.
Create an action of the type: “When an item is created (V2)”. Here you will need to specify the server, database, and table to connect to by creating a connection. You can also specify the interval of the check. As I use the consumption-based model, this also determines the cost of the logic app. At a reasonable interval, the app will only cost you a couple of euros per month.

In the next step – the action “Send Email (V4)” – we will compose our email and transfer it to SendGrid. Just as for the first step, you will need to create a connection first. We’ll use the API key we created before in the SendGrid portal to do so. Afterwards, use the output of the previous step to build your message.

Mails can be sent by simply inserting data into [dbo].[DatabaseMail] via the code below.
USE [JobDatabase]

GO


INSERT INTO [dbo].[DatabaseMail]

           ([MailText]

           ,[MailSubject]

           ,[MailTo]

           ,[MailFrom])

     VALUES

           ('A tricycle with two wheels is a bicycle'

           ,'Philosophy'

           ,'friedrich.nietzsche@hotmail.com'

           ,'thomas.costers@kohera.be')

GO

This is actually almost the same method that you use in elastic database jobs, we just need to be able to insert records. When creating an elastic jobstep in the JobDatabase, you can specify output parameters. When the step returns any data, these parameters will be used as a destination to store that data. So, in your jobstep you can just select any data to return. These records will be inserted in the mailtable in the JobDatabase and can then be used as building blocks for your email. Just make sure to match the column names of your destination table.
In this example, the logging table of the Ola Hallengren maintenance jobs is checked for errors and an email will be sent if it finds any.
DECLARE @JobName NVARCHAR(128) =  N'Index Maintenance'

DECLARE @JobStepName NVARCHAR(128) = N'Deploy Maintenance Schema.'

DECLARE @Command NVARCHAR(MAX) = N '

IF

(

    SELECT COUNT(1)

FROM [dbo].[CommandLog]

WHERE [StartTime] > DATEADD(hour, -24, GETUTCDATE())

       AND [ErrorNumber] <> 0

       AND [CommandType] = ''ALTER_INDEX''

) > 0

    BEGIN

        DECLARE @recipients NVARCHAR(250);

        DECLARE @subject NVARCHAR(250);

        DECLARE @text VARCHAR(MAX);

        SET @text = ''Index maintenance has failed on database ''+DB_NAME()+''. Please check the dbo.commandlog table.'';

        SET @recipients = ''alerting@kohera.be'';

        SET @subject = DB_NAME()+'': Azure index maintenance failed'';

        SELECT @text AS MailText,

               @subject AS MailSubject,

               @recipients AS MailTo;

END;'


DECLARE @CredentialName NVARCHAR(128) = N'JobCredential'

DECLARE @TargetGroupName NVARCHAR(128) = N'DatabaseMaintenanceGroup'

DECLARE @Parallelism INT = 1


EXEC jobs.sp_add_job

     @job_name = @JobName,

     @description = 'Verify index maintenance';


EXEC jobs.sp_add_jobstep @job_name = @JobName,

                         @step_name = @JobStepName,

                         @command = @Command,

                         @credential_name = @CredentialName,

                         @target_group_name = @TargetGroupName,

                         @max_parallelism = @Parallelism,

                           @output_type='SqlDatabase',

                           @output_credential_name='Credential',

                           @output_server_name='server.database.windows.net',

                           @output_database_name='JobDatabase',

                           @output_table_name='DatabaseMail'

And that’s actually all there is to it! If the query returns any result, a record will be generated. The MailID, InsertDate and internal_execution_id will be filled in automatically, so we can safely ignore those. And a couple of minutes later, depending on the interval you configured, the mail will be in your inbox!
| Cookie | Duration | Description |
|---|---|---|
| ARRAffinity | session | ARRAffinity cookie is set by Azure app service, and allows the service to choose the right instance established by a user to deliver subsequent requests made by that user. |
| ARRAffinitySameSite | session | This cookie is set by Windows Azure cloud, and is used for load balancing to make sure the visitor page requests are routed to the same server in any browsing session. |
| cookielawinfo-checkbox-advertisement | 1 year | Set by the GDPR Cookie Consent plugin, this cookie records the user consent for the cookies in the "Advertisement" category. |
| cookielawinfo-checkbox-analytics | 11 months | This cookie is set by GDPR Cookie Consent plugin. The cookie is used to store the user consent for the cookies in the category "Analytics". |
| cookielawinfo-checkbox-functional | 11 months | The cookie is set by GDPR cookie consent to record the user consent for the cookies in the category "Functional". |
| cookielawinfo-checkbox-necessary | 11 months | This cookie is set by GDPR Cookie Consent plugin. The cookies is used to store the user consent for the cookies in the category "Necessary". |
| cookielawinfo-checkbox-others | 11 months | This cookie is set by GDPR Cookie Consent plugin. The cookie is used to store the user consent for the cookies in the category "Other. |
| cookielawinfo-checkbox-performance | 11 months | This cookie is set by GDPR Cookie Consent plugin. The cookie is used to store the user consent for the cookies in the category "Performance". |
| CookieLawInfoConsent | 1 year | CookieYes sets this cookie to record the default button state of the corresponding category and the status of CCPA. It works only in coordination with the primary cookie. |
| elementor | never | The website's WordPress theme uses this cookie. It allows the website owner to implement or change the website's content in real-time. |
| viewed_cookie_policy | 11 months | The cookie is set by the GDPR Cookie Consent plugin and is used to store whether or not user has consented to the use of cookies. It does not store any personal data. |
| Cookie | Duration | Description |
|---|---|---|
| __cf_bm | 30 minutes | Cloudflare set the cookie to support Cloudflare Bot Management. |
| pll_language | 1 year | Polylang sets this cookie to remember the language the user selects when returning to the website and get the language information when unavailable in another way. |
| Cookie | Duration | Description |
|---|---|---|
| _ga | 1 year 1 month 4 days | Google Analytics sets this cookie to calculate visitor, session and campaign data and track site usage for the site's analytics report. The cookie stores information anonymously and assigns a randomly generated number to recognise unique visitors. |
| _ga_* | 1 year 1 month 4 days | Google Analytics sets this cookie to store and count page views. |
| _gat_gtag_UA_* | 1 minute | Google Analytics sets this cookie to store a unique user ID. |
| _gid | 1 day | Google Analytics sets this cookie to store information on how visitors use a website while also creating an analytics report of the website's performance. Some of the collected data includes the number of visitors, their source, and the pages they visit anonymously. |
| ai_session | 30 minutes | This is a unique anonymous session identifier cookie set by Microsoft Application Insights software to gather statistical usage and telemetry data for apps built on the Azure cloud platform. |
| CONSENT | 2 years | YouTube sets this cookie via embedded YouTube videos and registers anonymous statistical data. |
| vuid | 1 year 1 month 4 days | Vimeo installs this cookie to collect tracking information by setting a unique ID to embed videos on the website. |
| Cookie | Duration | Description |
|---|---|---|
| ai_user | 1 year | Microsoft Azure sets this cookie as a unique user identifier cookie, enabling counting of the number of users accessing the application over time. |
| VISITOR_INFO1_LIVE | 5 months 27 days | YouTube sets this cookie to measure bandwidth, determining whether the user gets the new or old player interface. |
| YSC | session | Youtube sets this cookie to track the views of embedded videos on Youtube pages. |
| yt-remote-connected-devices | never | YouTube sets this cookie to store the user's video preferences using embedded YouTube videos. |
| yt-remote-device-id | never | YouTube sets this cookie to store the user's video preferences using embedded YouTube videos. |
| yt.innertube::nextId | never | YouTube sets this cookie to register a unique ID to store data on what videos from YouTube the user has seen. |
| yt.innertube::requests | never | YouTube sets this cookie to register a unique ID to store data on what videos from YouTube the user has seen. |
| Cookie | Duration | Description |
|---|---|---|
| WFESessionId | session | No description available. |