

What if you could get the ease of phone notifications for whatever monitoring alerts you need? Then we have a solution for you with the app Telegram. Some of you may be familiar with this messaging tool, that’s very similar to WhatsApp. Telegram focusses on speed and security, is easy to use and free. Setting up the monitoring alerts through Telegram enables you to always be informed on any device. In this blog, we will show you how to set this up with the language PowerShell. We will also create a “bot”, which will be used to receive the messages that we are sending through PowerShell.
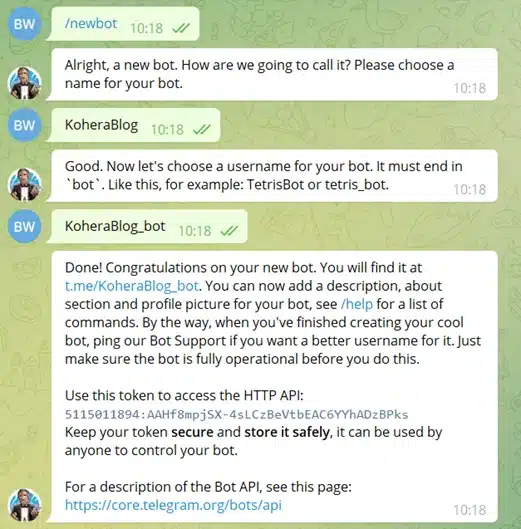
Open the Telegram app and look for the BotFather account in the search bar. Click the verified BotFather account, this bot will be used to create new bot accounts and manage your existing bots.
Open the chat with the BotFather.
The full process looks like this:

Your bot is created! Next, we need to add the bot to our group or channel so we can receive our chat ID. Pick whatever channel or group you want to use and add the bot. Once you’ve done that, you will need to make the bot administrator. That way we can get the list of updates for your bot.
For this step, you need to go to the Telegram website and fill in your bot API token.
https://api.telegram.org/bot<YourBOTToken>/getUpdates
Example:
https://api.telegram.org/bot5115011894:AAHf8mpjSX-4sLCzBeVtbEAC6YYhADzBPks/getUpdates
Then look for the “chat” object:
(Note: If you created the group/channel with the bot and you only get: {“ok”:true,”result”:[]} , please remove and add the bot again)

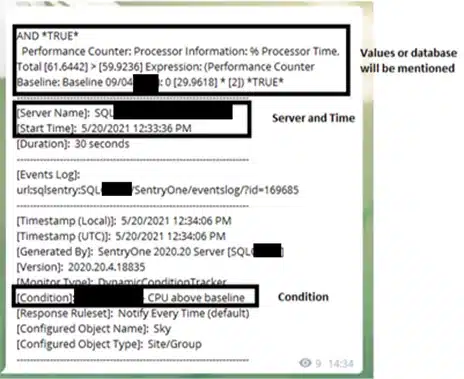
Now that we have all the parameters we need, we can go to the last and probably most crucial step: the PowerShell script. We have different ways to set up our script to fulfill different use cases. One is getting data from another application. Let’s say we have a monitoring application like SentryOne. When a certain condition is met within that application, we want a Telegram message to be sent.
{

$MyToken = "5313732773:AAGiZxJk6rgB4RkrlMGnWm28sj2mH_0cYDQ"

$chatID = -1001693547082

$rawBody = @{text='<%Message%>'}

$contentType ='application/json'

$jsonBody = (convertto-json $rawBody)

$Response = Invoke-RestMethod -Uri "https://api.telegram.org/bot$($MyToken)/sendMessage?chat_id=$($chatID)" -Method POST -ContentType $contentType -Body $jsonBody
Let’s break down the script to see what all these PowerShell lines mean:
When your condition is met and your PowerShell action is defined with the correct parameters, we will get a message like this on our Telegram chat.

Or let’s say we want to decide what we sent. We can change the script a little bit.
$MyToken = "5313732773:AAGiZxJk6rgB4RkrlMGnWm28sj2mH_0cYDQ"
$chatID = -625205559
$rawBody = @{text='Hello everyone, thank you for reading my blog!'}
$Response = Invoke-RestMethod -Uri "https://api.telegram.org/bot$($MyToken)/sendMessage?chat_id=$($chatID)" -Method POST -Body $RawBody
So, let’s run the last script and see which result we get.

You received a message from your Telegram bot! Using the above method, you will be able to send monitoring alerts through Telegram by using the app in your PowerShell scripts.
| Cookie | Duration | Description |
|---|---|---|
| ARRAffinity | session | ARRAffinity cookie is set by Azure app service, and allows the service to choose the right instance established by a user to deliver subsequent requests made by that user. |
| ARRAffinitySameSite | session | This cookie is set by Windows Azure cloud, and is used for load balancing to make sure the visitor page requests are routed to the same server in any browsing session. |
| cookielawinfo-checkbox-advertisement | 1 year | Set by the GDPR Cookie Consent plugin, this cookie records the user consent for the cookies in the "Advertisement" category. |
| cookielawinfo-checkbox-analytics | 11 months | This cookie is set by GDPR Cookie Consent plugin. The cookie is used to store the user consent for the cookies in the category "Analytics". |
| cookielawinfo-checkbox-functional | 11 months | The cookie is set by GDPR cookie consent to record the user consent for the cookies in the category "Functional". |
| cookielawinfo-checkbox-necessary | 11 months | This cookie is set by GDPR Cookie Consent plugin. The cookies is used to store the user consent for the cookies in the category "Necessary". |
| cookielawinfo-checkbox-others | 11 months | This cookie is set by GDPR Cookie Consent plugin. The cookie is used to store the user consent for the cookies in the category "Other. |
| cookielawinfo-checkbox-performance | 11 months | This cookie is set by GDPR Cookie Consent plugin. The cookie is used to store the user consent for the cookies in the category "Performance". |
| CookieLawInfoConsent | 1 year | CookieYes sets this cookie to record the default button state of the corresponding category and the status of CCPA. It works only in coordination with the primary cookie. |
| elementor | never | The website's WordPress theme uses this cookie. It allows the website owner to implement or change the website's content in real-time. |
| viewed_cookie_policy | 11 months | The cookie is set by the GDPR Cookie Consent plugin and is used to store whether or not user has consented to the use of cookies. It does not store any personal data. |
| Cookie | Duration | Description |
|---|---|---|
| __cf_bm | 30 minutes | Cloudflare set the cookie to support Cloudflare Bot Management. |
| pll_language | 1 year | Polylang sets this cookie to remember the language the user selects when returning to the website and get the language information when unavailable in another way. |
| Cookie | Duration | Description |
|---|---|---|
| _ga | 1 year 1 month 4 days | Google Analytics sets this cookie to calculate visitor, session and campaign data and track site usage for the site's analytics report. The cookie stores information anonymously and assigns a randomly generated number to recognise unique visitors. |
| _ga_* | 1 year 1 month 4 days | Google Analytics sets this cookie to store and count page views. |
| _gat_gtag_UA_* | 1 minute | Google Analytics sets this cookie to store a unique user ID. |
| _gid | 1 day | Google Analytics sets this cookie to store information on how visitors use a website while also creating an analytics report of the website's performance. Some of the collected data includes the number of visitors, their source, and the pages they visit anonymously. |
| ai_session | 30 minutes | This is a unique anonymous session identifier cookie set by Microsoft Application Insights software to gather statistical usage and telemetry data for apps built on the Azure cloud platform. |
| CONSENT | 2 years | YouTube sets this cookie via embedded YouTube videos and registers anonymous statistical data. |
| vuid | 1 year 1 month 4 days | Vimeo installs this cookie to collect tracking information by setting a unique ID to embed videos on the website. |
| Cookie | Duration | Description |
|---|---|---|
| ai_user | 1 year | Microsoft Azure sets this cookie as a unique user identifier cookie, enabling counting of the number of users accessing the application over time. |
| VISITOR_INFO1_LIVE | 5 months 27 days | YouTube sets this cookie to measure bandwidth, determining whether the user gets the new or old player interface. |
| YSC | session | Youtube sets this cookie to track the views of embedded videos on Youtube pages. |
| yt-remote-connected-devices | never | YouTube sets this cookie to store the user's video preferences using embedded YouTube videos. |
| yt-remote-device-id | never | YouTube sets this cookie to store the user's video preferences using embedded YouTube videos. |
| yt.innertube::nextId | never | YouTube sets this cookie to register a unique ID to store data on what videos from YouTube the user has seen. |
| yt.innertube::requests | never | YouTube sets this cookie to register a unique ID to store data on what videos from YouTube the user has seen. |
| Cookie | Duration | Description |
|---|---|---|
| WFESessionId | session | No description available. |